
I was very excited to open my Christmas presents and find a big, black, 400l plastic compost bin for my garden. Creating compost has been on my list of things to try once I had expanded and bedded-in the garden. Now is the hour, but where to start? Here’s what I’ve done to turn our house and garden waste into fertile fodder for next spring’s planting.

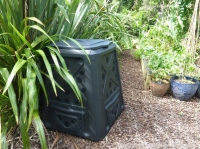
400l plastic compost bin
Compost has typically entered my garden either in polyurethane bags or on a trailer. It is something that I think of every time that I have put our kitchen scraps down the waste disposal or bagged our garden clippings ready for removal off site (or dumping down the back). I have memories of my Grandfather’s many homemade, wooden slatted bins down at the back of his large vegetable garden and I have always wanted to try it for myself.
Yates have a simple fact sheet for creating compost and many other suggestions for composting can be found with a simple Google search. I have gone with the Yates method, which looks like a cross between what is called “cold composting” and “hot composting” methods. The cold method seems to be about layering as you go, not turning the materials and it takes a long time. The hot method seems more about saving materials until you have enough to fill your composting system, then turning it every few days to aerate or when the compost gets hot.
I am definitely a beginner and this is as much an experiment as anything, but here is what my compost involves.
1. Identify a location suitable to create your composting activity
I found a spot that is close to my vegetable garden where it will receive both sun and shade during the day all year, and where the smell of decomposing materials will not bother our day-to-day living.
2. Identify a system for creating your compost
The big, black plastic bin suits my garden, as I have very little room to work with. It keeps things nice and tidy and is designed for easy addition of composting matter, turning, and retrieval and distribution of the finished product.
If you have more room to work with, a free-style pile of composting materials, a free-standing chicken wire container or a slatted wooden box or two may suit you better. You may also select a tumbler model, which removes the need to turn your compost regularly.
3. Layer your composting matter
To create compost you need a mix of “green/wets” (nitrogen rich) and “brown/dries” (carbon rich) materials, which are preferably added in layers and with more browns/dries that greens/wets:
- Greens include: grass cuttings, vegetable and fruit scraps, tea bags, weeds (without seed pods), soft green prunings and animal manure
- Browns include: cardboard and waste paper (shredded is better), hay and straw, tough or woody prunings, wood shavings and fallen leaves
If your compost will sit directly on the ground, start with a layer of coarse materials like sticks first.
You can also add egg shells, natural fibres and wood ash and you will want to avoid meat, fish, cooked food, cat or dog faeces and coal ash.
4. Add air, warmth and water
Your materials will need heat, moisture and oxygen to break down into compost. Turning compost with a garden fork every week or so, adding water to keep your compost as moist as a wrung out sponge, and keeping your compost somewhere warm (not hot) will provide the conditions needed to activate and maintain the composting process. When turning or mixing your compost, try to move the outside materials to the inside, so that they have the opportunity to “heat up” during the composting process to speed up the break down.
5. Help the process along
Some sources suggest adding handfuls of blood and bone as well as lime to your layers to feed the bacteria that is working on decomposition.
Timing
Suggestions for when your compost will be ready range between 18 days and twelve months, depending on whether you use the hot or cold composting method – and how much effort you put into your composting process. I am aiming to partially fill a new raised vegetable box for spring 2014, so I have about 9 months to create mine and I’m using a hybrid hot-cold method in an effort to do so.
Knowing when its ready
Sources say that your compost will be ready when it no longer gets hot in the middle and it has become a dark brown, earthy smelling material. Even at this stage your compost may still contain items that have not broken down, which can either be used anyway, sieved out or put into your next compost process.
You can view the Yates composting information here. It may also be interesting to check out the “lasagne method” if you have beds that are left empty for a while and creating a dedicated pile or bin is not for you.
I would love to hear how you create your compost and any tips that you have picked up along the way.

January 12, 2014 at 9:47 pm
Into the compost bin today to kick it all off: dry oak tree twigs and leaves, an unused bag of peat moss, two bags of rotted chicken manure, dry flax flowers and their stalks from last year, and vege scraps from the last two nights. Tomorrow it will all receive a good watering.